home MEGACART Mk II Multicart tape restoration cartridge case news Mk I Multicart Mk 0 Multicart credits contact us buy
Section III: The SC-3000 Mk II Multicart - Circuit Board, Boot Menu, 32KB SRAM, and Tape Games
The Mk II SC-3000 Survivors Multicart plays tape games and holds up to 63 SC-3000 or SG-1000 games ROM images (or around 40 ROM images plus a pile of tape software). It is built using techniques that have been around since the dawn of home computing. You could have (almost) built this back in 1984, and the design was definitely inspired by 1980s computer design.
Update: 18 Mar 2018 - the Mk II Multicart has been replaced by the new SC-3000 Survivors MEGACART. There is still lots of cool stuff on this page though, so feel free to keep reading.
Update: 7 Dec 2012 - check out the News Section for more recent updates to the Multicart like the cool new cartridge cases, and you can now buy your own SC-3000 Survivors Multicart. We really need to update this page with a nice new video. Maybe over the Xmas break :)
For those of you with a short attention span, here is the MK II Multicart in action. Many thanks to Sammy, age 5 3/4 for the camera work :) Note - this video was shot back in August 2011, and there have been *heaps* of improvements since then.
Is it a bird? Is it a plane? No - it's the SC-3000 Survivors Mk II Multicart!
The Mk II Multicart can play all the known SC-3000 or SG-1000 ROMs, and it comes with over 70 pieces of tape software:
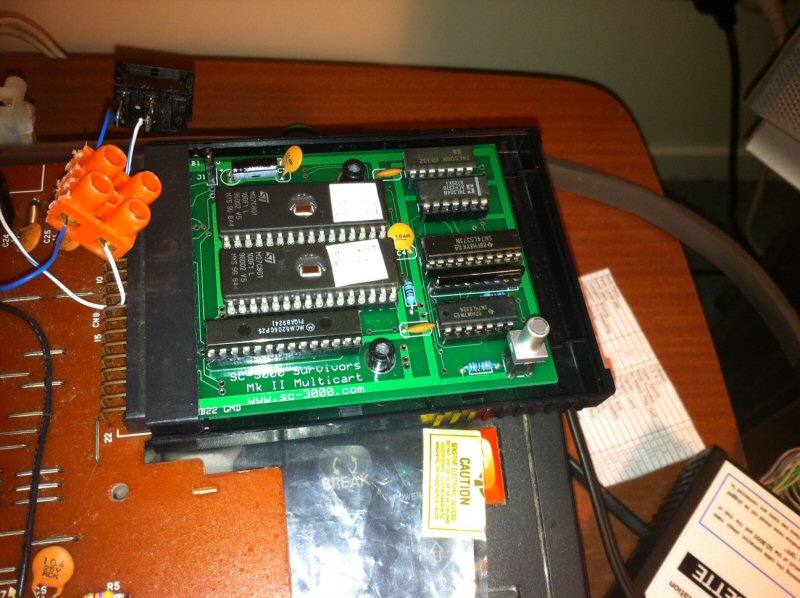 The assembled Mk II SC-3000 Multicart in all its 5v TTL glory
Mike Boyd Tape Games
- Burglar Bill (Jet Set Willy style game)
- Burglar Bill II
- Caverns of Karanor (Jet Set Willy style graphic adventure)
- Caverns of Karanor (infinite lives cheat mode)
- Decimator (Defender clone)
- Moonbase Alpha (graphic adventure plus digitized speech)
- Sir Roderick's Quest (graphic adventure)
- Sorceror's Apprentice (Mike Boyd graphic adventure with 80 screens to explore)
Arcade Packs by Stephen Coupe
- Arcade Pack I - Astro (Asteroids clone)
- Arcade Pack I - Gloopa
- Arcade Pack I - Shootout
- Arcade Pack II - AFOS (Tron light cycle style game)
- Arcade Pack II - Splat (Frogger clone)
- Arcade Pack II - Trojans
- Arcade Pack III - 1986 (Donkey Kong style game)
- Arcade Pack III - Bomber
- Arcade Pack III - Blackjack
Text / Graphic Adventures
- Castaway
- Castle of Fear
- Death Satellite
- Mars Adventurer
- Orb of Power
- The Tomb of Nozar
- Time Capsule
- Transylvania Castle of Horror
- Underworld of Kragon
- Young'ns
Other SC-3000 Tape Games (Commercial)
- Aerobat (vector graphics Cesenna 152 flight simulator)
- Astro Defense (Timegate Software)
- City Lander
- Deadly Jewel of Antark
- Delta Fighter (large 8-way scrolling game area - shoot the planes, bomb the crap out of the ground installations)
- Demon Gobbler
- Dungeons Beneath Cairo (early RPG game)
- Froggy
- Gold Miner (Donkey Kong / QBert crossover set in Haunted Gold Mine)
- Help (Crazy Crypt)
- Laser Blast
- Lumberjack
- Mars Mobile
- Monopoly
- Munchman (Pacman clone)
- One Day Cricket
- Pandamonium
- Satellite Salvage
- The House
- Towers of Hanoi
- Vermin Invaders
- Vortex Blaster (vertical space shooter plus digitized speech)
Educational / Utility SC-3000 Tapes
- Hangman
- Rocket Maths
- Spelling Tutor
- Sprite Generator (John Sands)
- Tank Addition
- Watch Me Draw
- Word Processor
SC-3000 Demos
- Color Mixing Basic Demo
- The Great Wave off Kanagawa (Japanese Art Basic Demo)
- Sega Basic Demo
- Otani Oniji II / Scowling Man Basic Demo
- What is Print 64? Demo
Sega Magazines / Home Brew
The following were all type-in programs from Sega Magazine from 1984 to 1988
- Artificial Intelligence
- Aircraft
- Astro Attack
- Balune
- Bubble Trouble
- Candy Kid
- Colditz
- Connect 4
- Delta Race
- Fireman
- Gunslinger
- HypnoQix
- Indy GP
- Jet Ranger (Basic / Machine code game from Sega Computer Magazine)
- Karate Champs (Basic game from Sega Computer Magazine)
- Sea Battle
- Serpent
- Shoot 'Em Up
- Star Wars
- Tank Battle
- The Dog (picture of The Dog from Footrot Flats)
EPSGMOD / VGM Music Player
The SC-3000 was never developed to its full potential. However it has the same sound capabilities as the Master System and other contemporary 8-bit systems. So we included some nice music tracks using the Z80 Player code distributed with MOD2PSG2.
- En Vard Fyra Javel (finalist in 2011 SMS Power Music Competition)
- Run Under Fire
- Air Wolf Theme
- Smooth Criminal
- M.A.S.H. Theme
- Star Wars Theme
- Beat It
- Bad
SC-3000 Survivors Demo
A short demo featuring a sample of Axel-F recorded via the SC-3000's cassette-in port, plus pictures of your friendly Survivors crew and a mystery guest.
Korean / Taiwanese ROMs
You will have to add your own 'official' SG-1000 / SC-3000 ROMs to the multicart yourself. But the following dumps from the Korean Samsung Gam*boy and Taiwanese Aaronix SG-1000 II clone are included with the multicart. They were never available for the SC-3000, and they all required minor tweaking to run on the multicart.
- The Black Onyx (English Translation by Bruce Tomlin and KingOfCrusher)
- Cabbage Patch Kids
- Circus Charlie
- Comic Bakery
- Gunsmoke
- Gunsmoke (infinite lives cheat)
- Hyper Sports II
- Magical Tree
- Xevious
- Yie Ar Kung Fu
The boot menu system is controlled either by the joystick or the keyboard arrow keys. You just scroll up and down until you find the option you want. And it also contains extra information about many of the games and a couple of interesting bits of SC-3000 history downunder for good measure.
Sadly, the current design does not work on a SG-1000, SG-1000 II, or Mark III as the consoles do not pass out all the required signals to the cartridge port. We have looked at alternate designs which could work on all those systems, but we are unlikely to develop those further, sorry.
So, you're probably wondering how it works? Well first lets have a bit of history...
First - a little bit of history...
The SC-3000 Multicart idea was born in June 2010. I had just bought some blank Basic IIIB PCBs (no ROM) from a guy in France and I thought I'd try burning a couple of my favorite games to play on the SC-3000. I hadn't heard of a multi-cart before and it just came up briefly in discussion with a couple of friends. That sounded pretty cool as an 'all-in-one' multicart design suits the SC-3000 really well as the games are small enough to fit all your favourites on a single multicart. So the next few months was spent bouncing ideas around, reading up on TTL logic, ordering various bits and pieces, and generally figuring out how the hell this sparky stuff works :)
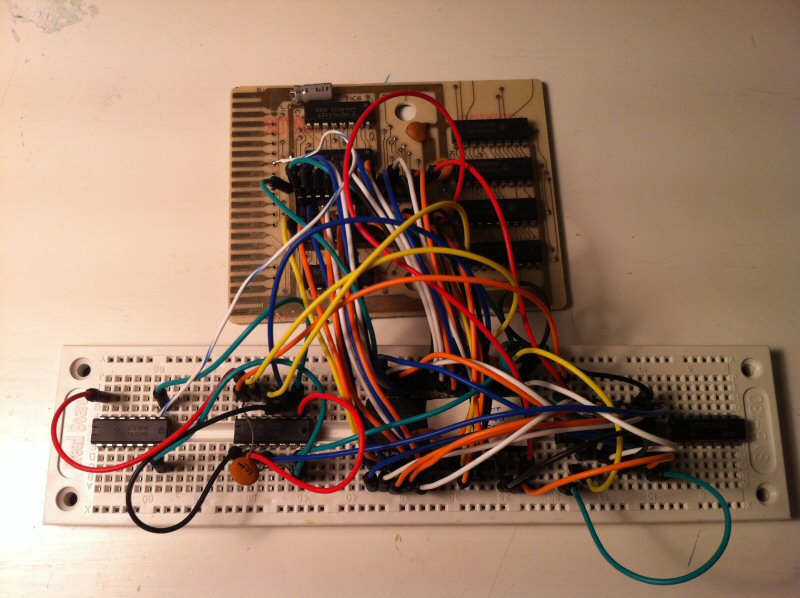 The original Mk II Multicart with Boot Menu breadboard layout
The Mk I DIP switched based multicart was a proof of concept to see if it could be done. But the long term goal was always a Boot Menu version and (if we were really lucky) instant loading tape games. The original plan was to get the Mk II Multicart working on the breadboard then to hack together some homebrew multicarts by stuffing a pile of extra wires and chips into a Basic IIIB case.
The first half of the plan worked great. The breadboard tests were a success! But there was no way in hell this was *ever* going to fit inside a cartridge case, and it would be a nightmare to manually attach wires to all the TTL logic chips. We needed... a circuit board.
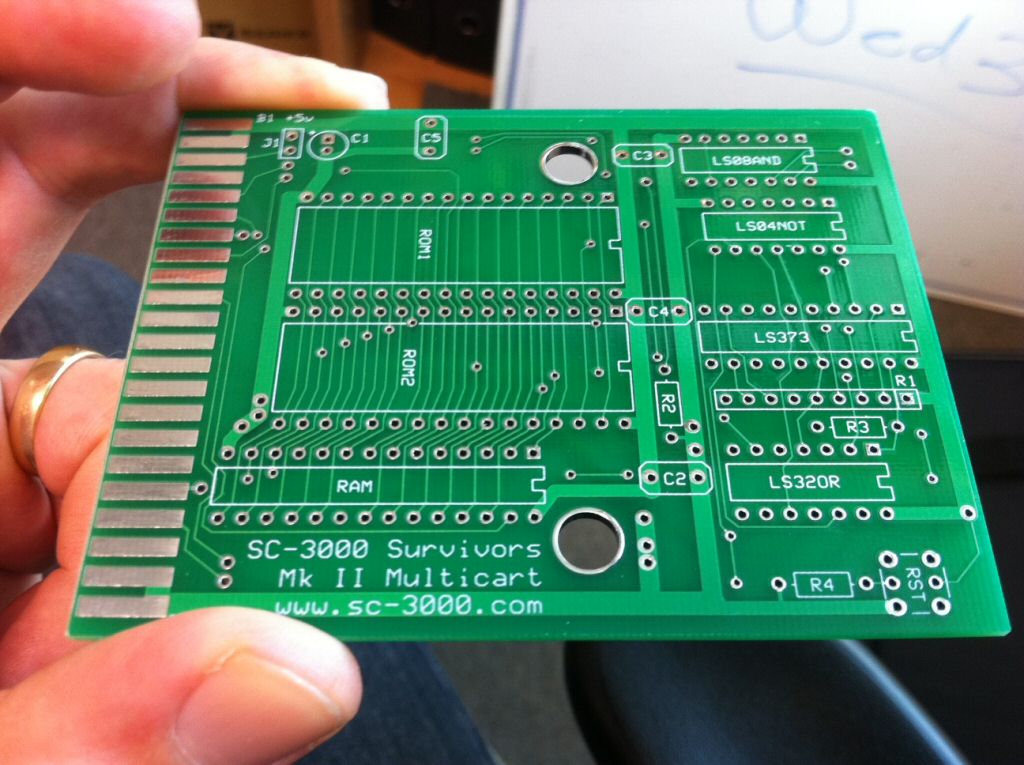 The Mk II Multicart PCB, hot off the press from Futurlec (Aug 2011)
The next 3 months was spent in refining the boot menu system and learning how to create and manufacture a PCB design. It is pretty straight-forward once you've done one, but it is one hell of a learning curve when you're starting from scratch. Still, we got there in the end and Futurlec did a really nice job on the PCBs.
The boot menu system is written using the WLA-DX assembler. The first pass was a simple keyboard driven menu system where you pressed 0..9 and A..Z to select a game. The menu system is now controlled either by the joystick or the keyboard arrow keys. You just scroll up and down until you find the option you want. We also included extra information about some of the games and a couple of interesting bits of SC-3000 history downunder for good measure.
And that brings us up towards the present day. So...
How does the Mk II SC-3000 Survivors Multicart work?
First, you should read the How / Why the Mk I Multicart Works overview. That works by attaching an 8MBit (1 Megabyte) EPROM to a Yamato cart, then using a DIP switch to let you choose any one of thirty-two games. That is a manual paging system that breaks the large EPROM into 32 slots of 32KB each (32 * 32KB = 1 Megabyte).
That is pretty cool, but you have to turn the computer off to change games. Then you have to read the label, fiddle with the DIP switch, and turn the computer back on again to select a new game. The Mk II multicart replaces that manual DIP switch with an 8-bit digital latch which is controlled by the boot menu to select all those different slots as required.
The assembled Mk II SC-3000 Multicart in all its 5v TTL glory
Check out the picture to the right. The main components are:
- 2 x 27C801 8MBit EPROMs
- 32KB SRAM
- 74LS373 8-bit latch
- Reset switch to restore the boot menu without having to switch power off
- Jumper between B02 and B03 pins to allow you to disable 32KB SRAM and use the SC-3000's onboard 2KB SRAM instead
- Various TTL glue logic chips
For the rest of this discussion I'm going to assume you either have a basic grasp of Z80 architecture, or that you have at least read the How / Why the Mk I Multicart Works overview.
Why two EPROMs? Well, in the words of Tim the Toolman, "More Power. Grunt grunt grunt." Well twice the storage space, anyway. I originally thought I'd be happy with 32 slots on a cart. I was mistaken :) Two EPROMs gives us 64 slots of 32KB to play with.
The 74LS373 8 bit latch does 3 things:
- It controls the A15 to A19 pins on the EPROMs to select another logical block
- It selects which of the two EPROMs is active at any one time (although the PCB will work happily with only the second EPROM installed)
- It enables / disables itself. This is a feedback loop for the Reset switch on the PCB which is there to get the boot menu back without powering off
The latch is mapped onto the SC-3000's I/O bus at port $e0, which is free on the SC-3000. Actually, what it *really* does is latch the value on the data lines when A5, A6, and A7 are all high and /IOW is low. That means it will respond to writes to any port in the range $e0 to $ff.
The Reset switch behaviour is interesting. Unfortunately the SC-3000 does not pass the Z80 reset line out to the cartridge port. So the hard reset switch on the multicart disables the 8 bit latch which selects the last slot on the second ROM because the 74LS373 has internal pull up resistors. This is where the boot menu goes. You then press the Reset button on the SC-3000 keyboard which triggers the Reset handler in the boot menu block which basically returns back to $0000, cleans up the system, and displays the boot menu.
The game ROMs are all 32KB or smaller (16KB / 8KB). The SC-3000 is naturally set up for having the ROM in the lower 32KB of memory, and the RAM in the upper 32KB - either 2KB from C000 to C7FF (on-board) or 16KB ($8000 to $BFFF) or 32KB ($8000 to $FFFF) with the Basic carts. And there are no known SC-3000 carts that use a paging system - that started with the Master System.
Fun Fact: The original proof of concept was using a DIP switch, but I always envisaged using an 8-bit latch. However my original (bad) plan was to use an 8255 PPI. Blame the SF-7000 for that idea. The SF-7000 Super Control station is the only 'original' Sega peripheral to use paging. That has an IPL (Initial Program Loader) which is used to bootstrap the system and it uses an 8255 PPI to swap the IPL in / out of memory. That actually gave some of the original inspiration for the multi-cart design - I even bought a couple to use. But the damn things are huge, and too complex to intialize. I took one look at it and hunted around for a smaller standalone 8-bit latch, hence the SNLS373.
But the 8255 PPI was a really nice way of simplifying your I/O interface. Just map the PPI onto your I/O bus, then connect your peripherals to that. The SC-3000 uses a PPI for input/output from the keyboard, joysticks, printers, cassette port etc., and the SF-7000 uses one for the Floppy controller, IPL paging control etc.
Note: The following needs a bit of editing. I'm splicing this together from my notes plus some bits I wrote in the dev forums on SMSPower
So the original paging system was based around just swapping out the lower 32KB of memory space and either using the on-board SRAM, or supplying your own.
For the Mk I multicart I desoldered a ROM off a Yamato cart. Then I soldered a 32 pin socket onto the original 28 pins. The highest 5 address lines on the 32 pin socket are hard wired to a DIP switch. That manipulates A15 to A19 on the 8MBit EPROM. So depending on the position of the DIP switches, you select a different logical 32KB block within the 8MBit EPROM. The lower 15 address lines A0 to A14 are all hardwired to the A0 to A14 pins on the EPROMs. You then turn on the computer, and it is just as if a different cart had been plugged in.
There are some obvious extensions to this, including using a 6th pin on the DIP switch wired to A14 through an OR gate so that either the Z80 A14 line OR the DIP switch can set A14 high. That gives you 16KB paging blocks. I've tried that and it works fine. That is actually handy because there are ummm... something like twenty two 16KB or 8KB ROMs, so you can pack more in. Unfortunately I ran out of room on the PCB (and time and patience, it has to be said), to do 16KB pages on the first PCB prototype. However I have left one bit of the 8-bit latch free to try this as a future mod.
The PCB version uses a 74LS373 8-bit latch in place of the DIP switch. This is connected to the SC-3000 I/O bus on port $e0. The $e0 to $ff range is used by the SF-7000, so I knew this range would be clear of interference. After reading your hardware notes I knew there could be unpredictable behaviour if I put it lower even if it wasn't on one of the 'known' SC-3000 ports.
The PCB also has 32KB of SRAM. This is mapped at $8000 to $FFFF, just like the Basic IIIB cart.
So it is also perfectly suited to running tape games. Those always run in the upper 32KB of RAM and expect to have the IIIB ROM in the lower 32KB. I just need to write a custom loader for each one to load from the multi-cart paging system instead of calling the tape load routines. Single-load tape games are easy. You just copy the data to $9800, reset the basic pointers at $8160, and jump into the basic RUN entry point.
Multi-load games with seperate title screens etc. are harder and need the custom load treatment. But apart from loading from the multi-cart, the games load in the same sequence they did when loaded from tape, which is kind of neat.
So the ROMs are all uncompressed which makes for a nice simple hardware design with a very basic paging system. Where I have been using compression is in the loading of tape games. Those *are* copied into the top 32KB of RAM, so some of those are compressed to save space. Plus I've been playing around with digitized photos and music files etc. so the aPLib compressor is very handy for that.